If you find this add-on useful, please star it on GitHub — stars show appreciation and help maintainers know their work matters.
![]()

ddev-addon-template
- What is ddev-addon-template?
- Components of the repository
- Getting started
- How to debug in Github Actions
What is ddev-addon-template?
This repository is a template for providing DDEV add-ons and services.
In DDEV addons can be installed from the command line using the ddev get command, for example, ddev get ddev/ddev-redis or ddev get ddev/ddev-solr.
This repository is a quick way to get started. You can create a new repo from this one by clicking the template button in the top right corner of the page.

Components of the repository
- The fundamental contents of the add-on service or other component. For example, in this template there is a docker-compose.addon-template.yaml file.
- An install.yaml file that describes how to install the service or other component.
- A test suite in test.bats that makes sure the service continues to work as expected.
- Github actions setup so that the tests run automatically when you push to the repository.
Getting started
- Choose a good descriptive name for your add-on. It should probably start with “ddev-“ and include the basic service or functionality. If it’s particular to a specific CMS, perhaps
ddev-<CMS>-servicename. - Create the new template repository by using the template button.
- Globally replace “addon-template” with the name of your add-on.
- Add the files that need to be added to a DDEV project to the repository. For example, you might replace
docker-compose.addon-template.yamlwith thedocker-compose.*.yamlfor your recipe. -
Update the
install.yamlto give the necessary instructions for installing the add-on:- The fundamental line is the
project_filesdirective, a list of files to be copied from this repo into the project.ddevdirectory. - You can optionally add files to the
global_filesdirective as well, which will cause files to be placed in the global.ddevdirectory,~/.ddev. - Finally,
pre_install_commandsandpost_install_commandsare supported. These can use the host-side environment variables documented in DDEV docs.
- The fundamental line is the
- Update
tests/test.batsto provide a reasonable test for your repository. Tests are triggered either by manually executingbats ./tests/test.bats, automatically on every push to the repository, or periodically each night. Please make sure to attend to test failures when they happen. Others will be depending on you. Bats is a simple testing framework that just uses Bash. To run a Bats test locally, you have to install bats-core first. Then you download your add-on, and finally runbats ./tests/test.batswithin the root of the uncompressed directory. To learn more about Bats see the documentation. - When everything is working, including the tests, you can push the repository to GitHub.
- Create a release on GitHub.
- Test manually with
ddev get <owner/repo>. - You can test PRs with
ddev get https://github.com/<user>/<repo>/tarball/<branch> - Update the
README.mdto describe the add-on, how to use it, and how to contribute. If there are any manual actions that have to be taken, please explain them. If it requires special configuration of the using project, please explain how to do those. Examples in ddev/ddev-solr, ddev/ddev-memcached, and (advanced) ddev-platformsh. - Update the
README.mdheader in Title Case format, for example, use# DDEV Redis, not# ddev-redis. - Add a good short description to your repo, and add the topic “ddev-get”. It will immediately be added to the list provided by
ddev get --list --all. - When it has matured you will hopefully want to have it become an “official” maintained add-on. Open an issue in the DDEV queue for that.
Add-ons were covered in DDEV Add-ons: Creating, maintaining, testing (part of the DDEV Contributor Live Training).
Note that more advanced techniques are discussed in DDEV docs.
How to debug tests (Github Actions)
-
You need an SSH-key registered with GitHub. You either pick the key you have already used with
github.comor you create a dedicated new one withssh-keygen -t ed25519 -a 64 -f tmate_ed25519 -C "$(date +'%d-%m-%Y')"and add it athttps://github.com/settings/keys. -
Add the following snippet to
~/.ssh/config:
Host *.tmate.io
    User git
    AddKeysToAgent yes
    UseKeychain yes
    PreferredAuthentications publickey
    IdentitiesOnly yes
    IdentityFile ~/.ssh/tmate_ed25519
-
Go to
https://github.com/<user>/<repo>/actions/workflows/tests.yml. -
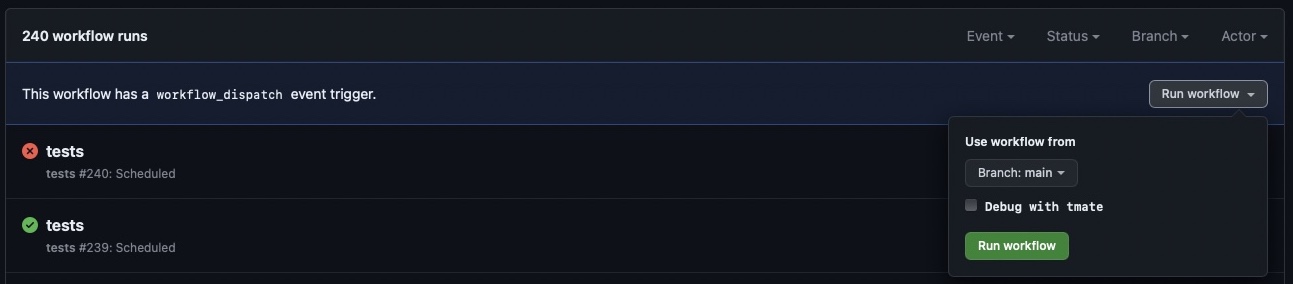
Click the
Run workflowbutton and you will have the option to select the branch to run the workflow from and activatetmateby checking theDebug with tmatecheckbox for this run.
-
After the
workflow_dispatchevent was triggered, click theAll workflowslink in the sidebar and then click thetestsaction in progress workflow. -
Pick one of the jobs in progress in the sidebar.
-
Wait until the current task list reaches the
tmate debugging sessionsection and the output shows something like:
106 SSH: ssh [email protected]
107 or: ssh -i <path-to-private-SSH-key> [email protected]
108 SSH: ssh [email protected]
109 or: ssh -i <path-to-private-SSH-key> [email protected]
-
Copy and execute the first option
ssh [email protected]in the terminal and continue by pressing either q or Ctrl + c. -
Start the Bats test with
bats ./tests/test.bats.
For a more detailed documentation about tmate see Debug your GitHub Actions by using tmate.
Contributed and maintained by @CONTRIBUTOR
If you find this add-on useful, please star it on GitHub — stars show appreciation and help maintainers know their work matters.